Content
It seems to us that we have not yet written everything about crafts for the New Year, although there are a lot of interesting articles and ideas on this topic on our portal. But one topic was only partially covered - this is a case for a bottle of champagne for the New Year. It is done easily and quickly, and a present or as a table decoration turns out to be original and fun. Stock up on felt, fabric, old jeans, beads, buttons and all the related material and let's get creative!
At the very end of the article is an interesting master class on decoupage technique, but be sure to read and see all the ideas that we have collected.
Decorate a bottle of champagne
A bottle cover for the New Year can be made from elementary ribbons, thin ribbons, beads, or beads and pearls strung on a fishing line. What is enough imagination, so make it out. The main idea looks like this:

You can take a wider ribbon, then the bottle will be easier and faster to decorate. You can also stick different beads and any other decor on the ribbon itself to make the product look more elegant. You can use several ribbons of different colors to create something like a dressy bottle costume, see the photo:

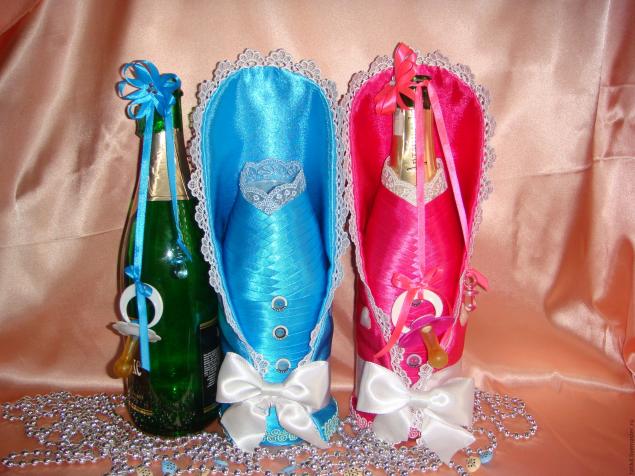
And here's the girl's version. Thus, it is quite possible to arrange a bottle of champagne for a wedding or Valentine's Day:
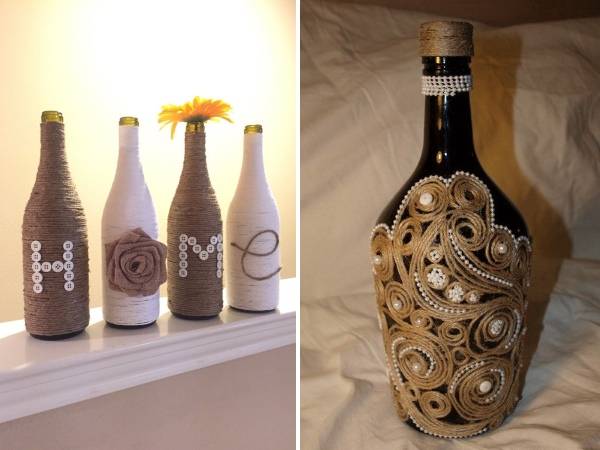
Twine for bottle decoration
You can create country-style decor with twine. This is quite painstaking work and you will need glue, but the result is very stylish bottle clothes for the New Year. From the same twine, you can twist impromptu flowers and decorate the bottle with them. In addition, you can glue acorns, spruce twigs, cone chips and other natural material.
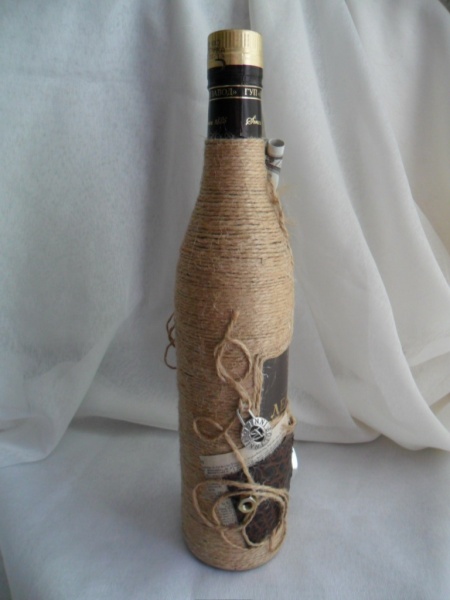
By the way, empty bottles can also be decorated and used as a vase or decorative element to decorate the interior. In such vases you can put dried flowers, tree branches, decorative feathers.

Liquor bottle design paper
Don't underestimate paper. It can be ordinary colored paper, silence, corrugated paper, more dense colored double-sided. Do-it-yourself champagne cover for the New Year can be made using one of these types of paper:
All you need is a small amount of crepe paper, Christmas tree beads, gift ribbons, Christmas decorations, and glue.
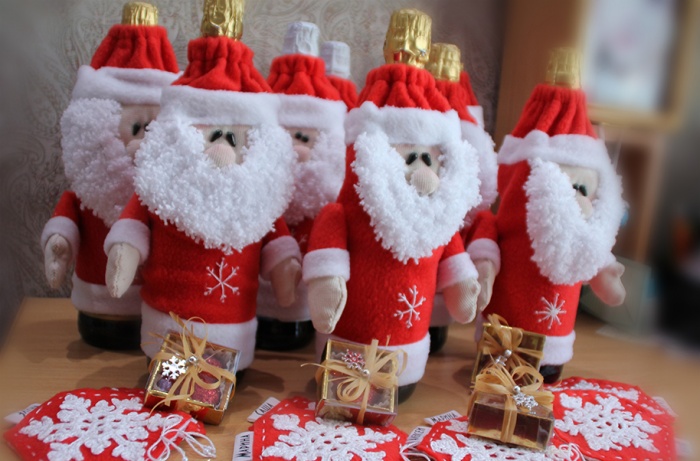
And for the next option, you only need red, black and gold paper and now your bottle of champagne is dressed in a Santa Claus costume.
Also make hats from thick cardboard and add cotton wool or a special filler for toys.

The exact same option can be made from felt or any suitable fabric:

Well, since we have smoothly moved on to the fabric, we suggest looking at a few more interesting options that can go like a bottle cover for the New Year:


In a bag, it is most convenient to present a bottle of champagne or wine as a gift.
Well, to create a beautiful and more complex cover, you will need a pattern for a bottle of champagne for the New Year. We offer several options.
Do not forget that for a quality product you will need seam allowances and good material.

Knitted covers
This is for lovers and craftsmen! Well, or for those who are not afraid of work, like to try something new and, in general, a jack of all trades. In the end, everything can be learned. Although there is one trick - the cover can be made from the sleeve of an old sweater or jacket. You just need to carefully cut out the required size and hem it well so that the cover does not come undone while you are carrying a gift to visit.

You can tie a short cover, without a bottom or with it - that's how it goes:

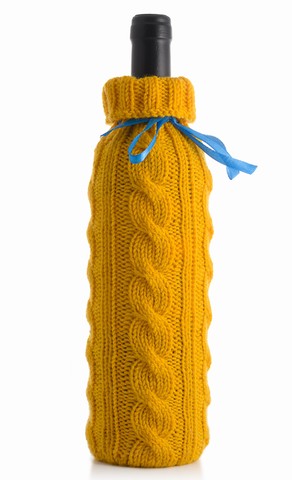
Don't forget that next year is the year of the yellow dog, so New Year's knitted bottle clothes can be done in bright yellow colors. From above, by the way, you can sew or hang a souvenir in the form of a dog made of felt. In our articles, we talked about how to sew such souvenirs, but let's give an example again:

You can go in a very simple way - knit a thin scarf and a hat especially for your idea. Looks very elegant and festive! Corresponds to the spirit of the New Year and winter:

A little more time and threads will be required for a knitted bag, but you can beautifully present some good alcohol in it.

Feel free to use other materials to complement your knitting. It can be felt, thick suiting fabric, thick colored cardboard, jeans and other materials.

You can always get creative, especially if you are good at crocheting or knitting and knitting, let's say, a story cover. Something like that:

Sequins and glitter bottles
New Year is the same radiance, brilliance, fireworks, colorful lights. A great option for decorating a bottle of champagne. Use glitter, loose sequins of different sizes and colors, and glue. Apply it to the entire surface of the glass and until the glue has dried, carefully apply the sparkles so that they are as evenly distributed as possible. You can use the ombre technique to make the bottle have beautiful color transitions:

Large sequins also look beautiful, they can even be mixed with confetti:

Decorative details for decoration
Clothing for a bottle of champagne for the New Year may consist of separate beautiful New Year's details. We suggest that you first look at the ideas, and then try to make them:

Use regular corks and glue to create a decor that fits perfectly on the New Year's table.
And a hat with a beard will help dress up the bottle in Santa Claus:
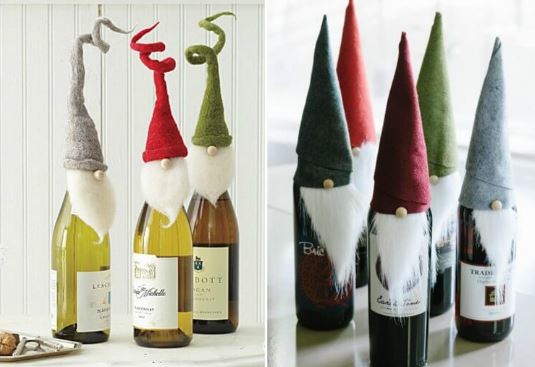
The hat can be made from felt, felted from wool, or any other material you choose. As a beard, use cotton wool or a special decorative material.
Ribbon, bow and Christmas tree decorations and here you are ready for New Year's clothes for the bottle.
Remember what New Year's compositions we have already suggested you make using fir branches, beads, cones and other decor. It can be used to decorate alcohol:

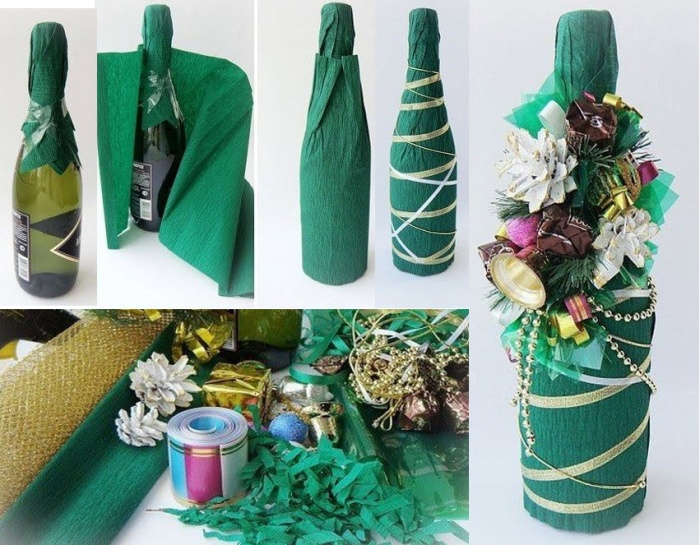
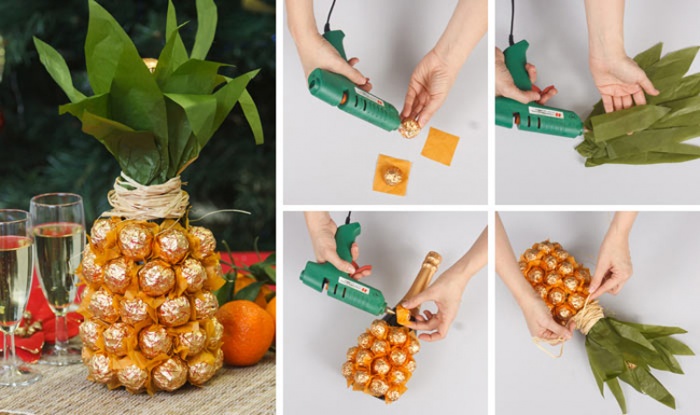
Candy decorative pineapple
Let's call it a conditional cover, because in our understanding, this is already a whole New Year's composition. What do you need:
- in fact, the champagne itself;
- glue;
- candies;
- corrugated paper.
Many needlewomen pre-wrap the bottle with paper, but in principle, this is not so necessary:
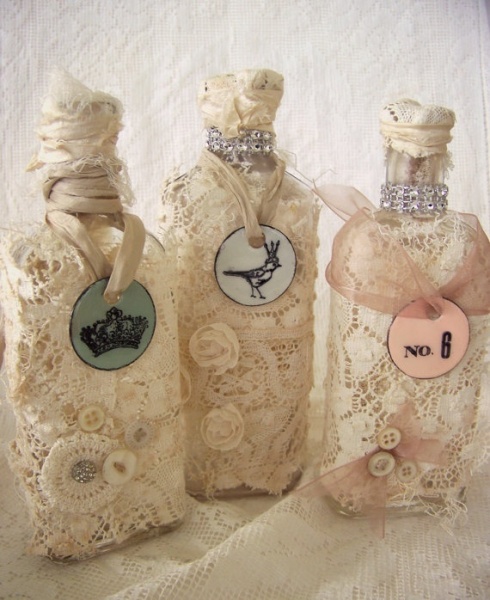
A few more unusual ideas

Sequins, twine, stones and the boundless imagination of the needlewoman are used here. And the next option is very gentle and more suitable for a wedding. But if you pick up darker lace inserts, then it will do for the New Year:
How do you like pasta decoration? The photo shows empty bottles, but what's stopping you from decorating a bottle of champagne with pasta?

Macaroni can be glued in a chaotic manner and immediately painted over both the bottle and the decor with spray paint, or you can paint the decor separately and only then glue it.
Good afternoon, for this New Year's season, I decided to make a convenient navigator article for all existing ways crochet a Christmas tree. We will learn how to knit a variety of Christmas trees with our own hands. Let's start gradually - first the simplest Christmas trees, then more difficult. You will be able to link flat and voluminous crochet Christmas trees. New Year's with decorations. Forest, snowy. You will find a variety of models of knitted Christmas trees in this article. And I will also give clear explanations for each model. AND step by step master classes they will give an understanding in what sequence and what needs to be done to get a beautiful crochet Christmas tree.
Christmas trees HOOK
Based on the CONUS.
Here in the photo below we see a Christmas tree in the form of a crocheted cone. Here is the usual circular knitting with a gradual decrease in the number of columns in a row. Therefore, the circle narrows and narrows - there are fewer and fewer columns in the circle. And gradually we narrow down to the top.

The decrease in the number of columns is due to the fact that we are in several places of our circular row do a double stitch. That is knit two stitches together- we hook the first one (and do not pull the thread into it, but leave it on the hook), and immediately hook the second column on the same hook - and only then we do the broach TWO SIMULTANEOUS columns on the hook.
Therefore, we divide the circular row into 6 sectors - like a cake into 6 pieces is divided in a circle. And at the beginning of each sector, we knit two columns together. Decreasing the stobics one by one in each of the 6 sectopros will give us a narrowing of the cone IN ALL PLACES SIMULTANEOUSLY. And the tree will taper evenly on all sides.
Here's what it looks like in practice....
For example, you have only 54 columns in the first knitting circle (in the very bottom row of the future Christmas tree) - divide by 6 (these are sectors) - we get 9. So our sector consists of 9 columns.
And so we knit 4-5 rows just right with a crochet - without subtracting anything. Round. And then in the first subtractive row we knit EVERY NINTH AND EIGHTH COLUMN TOGETHER.
Then again we knit one row without decreasing.
Then in the second decreasing row - we still have the same most 6 sectors- but already in each sector we have not 9 columns, but only 8. And therefore we knit together every EIGHTH AND SEVENTH column.
Again we knit one row without decreases.
And in the third subtractive row - we already have only 7 columns in the sector. So we will knit together every SEVENTH AND SIXTH columns.
The principle of knitting a conical Christmas tree with your own hands, as you can see, is SIMPLE.
If you wish, you can use threads of different textures - fluffy, knotted - to get a pel with an interesting knit pile.
You can also alternate the color of the threads in each of the rows - dark green and light green.
Or you can knit not just STAINLESS (simple crochet stitches), but use a embossed CONVEX KNIT PATTERN - for example, CONES, as in the right photo below.

You can knit a Christmas tree WITH RELIEF - as in the photo below. Here the Christmas tree is knitted not from the bottom up, but from the top to the bottom. And as we see in the photo, the embossed circumferential RIBs appear on the Christmas tree because we are starting a new circular row, sticking a hook not at the top of the bottom row, and to the base (bottom) of this row or even to the previous row. And the row itself remains sticking out above the surface of the knitted Christmas tree.

At the end of the work, you can decorate a knitted Christmas tree with beads or beads. Just pulling them through the knitting on a thread with a needle. Here's how it's done in the crochet Christmas tree photo below.

How to make a TIGHT BOTTOM
at a Christmas tree knitted with a cone.
When you tie the cone, you will need to crochet the ROUND FLAT BOTTOM of our knitted Christmas tree. It is knitted simply in a circle - with the addition of columns evenly - one at a time in 6 sectors of knitting.
To add a table - you just need to knit one and one more column into one loop of the bottom row.

The knitted round bottom of the Christmas tree needs to be reinforced with cardboard so that it does not bend with a ball. So that the Christmas tree keeps a flat, even shape of the bottom at the bottom.

After working with the bottom, we fill the Christmas tree with padding polyester or cotton wool and sew the bottom - along the edges of the cone - with a hook or a needle.

What else can be done
with cone tree
(lace crochet).
But that's not all the work. Perhaps you don’t like the too straight and smooth surface of the conical Christmas tree - then let's TIE IT with crochet lace - colored threads.
Here in the photo below you see that the finished cone of a knitted Christmas tree already stuffed with padding polyester was taken and BOUND in red and white circular rows.

How it's done?
We take in hand the finished conical Christmas tree - already thick, stuffed with cotton wool. Hook. And a ball of red thread. We stick the hook into the side of the Christmas tree (in any row, any place). And with the end of the hook that looked out of the Christmas tree, we PICK UP THE RED THREAD from our ball. They picked it up and stretched it out - and went to knit in a circle - picking up our Christmas tree by the side. along the selected row. We picked up and knitted a column, picked it up and knitted it - we go in a circle around the side of the Christmas tree - and we get a red strapping with columns - as in the photo above.
We repeat the same with WHITE threads in another row of the conical Christmas tree.
Lace tying of a cone herringbone
(tied with petals).
According to exactly the same principle (as described above), the LACE STRING of the conical Christmas tree is made in the photo below.
Here, too, at first they made straight conical silhouettes of Christmas trees, stuffed them with padding polyester, and then picked up a hook and thread. They stuck the hook into the side of the finished Christmas tree - in any row - and began to tie it with single crochets (first row), walking along the selected row of the cone Christmas tree. And then this harness again in a circle already with PETALS - where 6 columns with a crochet are immediately knitted into one loop - and it turns out beautiful round petal (spruce foot). Between the petals we knit one small stringless column.

And the DENSITY OF LACE STRING can be different. That is, here pictured above between the lace petal rows, the body of the cone itself shines through - that is, the lace trim is done in every 7th row of the cone
And here - pictured below - lacy rows are more tightly heaped together - so that the cone is not visible and it seems that the whole Christmas tree consists of petals. Here, lace tying is done in every 4 rows of the cone.

You can tie the lace petals only at the bottom of the Christmas tree - as is done on the New Year's crochet crafts from the photo below.
And pay attention to the lace petals on the cone Christmas tree can be placed with a CHESS.

And you can only do THREE ROWS OF BINDING as in the photo below. And fill the empty aisle with bright beads and curly sequins.

And one more thing I want to draw your attention ...
Ears-petals can be of various shapes. The more columns we knit in one hole of the row, the wider and sagging “ear” we get from a crocheted Christmas tree. Here in the photo below we see a lace ear in 12 columns, and double-threaded high.

Your ears-paws may even be too big and spread out. Overshadowing the conical base itself with its size. And then your Christmas tree may look like this - as in the photo below. Here, each row of strapping also has an EDging with gold threads - just strapping with single crochets - along the edge openwork pawed rows.

And on crocheted Christmas trees, the ears can have a DIFFERENT SHAPE - for example, pointed as in the photo below. The knitting pattern for a patterned lace clove can be BORED from the pattern of any crocheted snowflake. Our website has article on knitted snowflakes- it will do, there are many simple schemes.

And IN THE SAME WAY, you can make just such a Christmas tree - the photo below. See? Here rows of petal binding (green threads) alternate with rows of lace binding (white threads).
- Here, first we knit a green simple cone - the basis of the future Christmas tree. According to the method that is described at the very beginning of the article.
- Then we fill the cone with cotton wool, knit the flat bottom of the Christmas tree - close the bottom of the Christmas tree (see the master class above).
- And after that, with green threads, we knit the PETAL BINDING of the Christmas tree in 6 rows (in a circle), evenly distributed along the height of the cone.
- And then between the petal rows we make a WHITE LACE trim with an openwork pattern of your choice.

You see - how interesting. The same way CONE CHRISTMAS HOOK - can give such a variety of options for knitted Christmas trees.
Christmas tree crochet master class
PETAL FABRIC METHOD.
And here is another beautiful way to tie a Christmas tree with embossed round petals. Here knitting does not go in a circle.

Here we first create a triangular canvas - which we fold into a conical bag, form a Christmas tree.
Here is a master class showing the principle of knitting such a fabric. This lesson uses a small canvas, just a few petals - for a very small Christmas tree. Of course, you can choose the number of tiers of the Christmas tree yourself, and based on this, decide what size of canvas is needed for this.
Here is the principle of work. The first stage, we simply create a narrow grid - this will be the base for which the first row of petals will catch on. A chain of airs - and on it columns with a crochet. The columns go with alternation - two columns in a row, then one air (we skip from the bottom and make one crochet from above), again two columns in a row, and again we skip one air from above and below.

And now we will knit the first petal row. In those places where we had two columns close - between them, in this narrow gap, we knit a petal - we simply knit 12-14 columns into this gap - and they themselves move apart from tightness in a circle, forming a round petal.

Further (photo below) over this first petal row we knit again a row of the same base grid (as from the first photo) - two columns side by side and between them we skip the air loop from above, and from below we skip the loop of the bottom row.

And again, in this new base mesh, we knit the petals in the same way - into each gap between the columns standing next to each other.

As the rows move to the top of the tree, the canvas should narrow. Therefore, in each row (or in every second row) of our canvas, we must knit one petal less. To do this, the base grid for this reduced row must be made shorter by one pair of columns - from the edge.

Christmas tree crochet
Knitted rectangles.
And here is another tricky way to crochet ears-paws near the Christmas tree. Here they will be rectangular.

Here each petal is a RECTANGLE crocheted. First we knit an AIR CHAIN of 7 loops + 2 on the hem - along which 7 single crochets are knitted, then a turn in the return and another row of 7 columns, again a turn in the return and another row of 7 columns. And from the same place where our hook stopped with a loop on it, WE AGAIN MAKE A CHAIN OF AIR from 7 loops + 2 on the rise, and repeat the same rows of 7 columns along it - back and forth.
And in the end, we have in our hands a garland of rectangular petals - as in the photo below.

By the same principle, one can connect long narrow petals for the Christmas tree. Here we knit a longer chain of airs - and we knit only one row of columns along it. It turns out a shaggy crocheted Christmas tree panicle.

CHRISTMAS Puff
How to crochet.
Puff method No. 1 - FROM CONES.
You can tie a Christmas tree and here's how. Take threads of two shades of green and tie several cones - first a small one (for the top), then a larger cone, even larger in size, and more and more. With color alternation. After that, we simply put the cones on top of each other - like a pyramid - and we get such a crocheted puff Christmas tree (as in the photo below). You can leave even edges at the cones, or you can tie the edges of each cone with wavy lace (alternating columns with two crochets (in the petal) and columns without crochets (between the petals).

Puff method number 2 - from pancakes.
In the same PUFF CHRISTMAS technique, you can use not cones - but flat "pancakes" crocheted. Like these ones. We knit several of them - each one is slightly larger in size than the previous one.

And then we collect a Christmas tree from them by folding them in a pile - from large to small. Some knitted pancakes can be made from white threads, and then you get the effect of the fastened paws of a Christmas tree.

Puff method No. 3 - FROM RINGS.
We can also make a layered Christmas tree ring binding method. We tie the rings with a hook - we work with them as if we had a ring in our hands not made of plastic, but a familiar chain of air loops closed in a circle.

Rings do not have to be different sizes. You can take the same rings, but tie each with a different number of rows of columns.

Then all the rings are assembled on a rod (a pencil, also tied with single crochets).

Or you can simply put all the rings on top of each other - fix it with threads (sew the ring to each other). And put the bottom hole on the bottle cap - like in the picture below.

And you can add a snowy white trim around the edges of the rounds and the top part of the knitted Christmas tree. Get the effect of snow.
Puff method No. 4 - CURLY.
We all know how to knit curly pancakes. It's simple. If, when knitting a pancake in a circle, add not the prescribed number of columns, but twice as much, then our pancake will begin to curl around the edges - to give a wave. And this is good. This is another way to crochet a beautiful Christmas tree.
The more you add columns in a circle, the steeper the wave will be along the edge of your knitting. 
These curly pancakes can be assembled into a curly Christmas tree. The beginning of these pancakes can be FLAT, or can be in the form of a cone (as in the photo below). You see - each pancake has a convex middle in the form of a cap. This is because at first we knitted a cone (we added few columns in a circle), and then we sharply increased the number of columns and our knitting became flat in a circle (like hat brim), and then curled up in a steep wave.

Then we dress these curly pancakes in a Christmas tree. In order for the tree to have a strong core, you can insert a solid object into the bulge of each pancake (the neck of a bottle, a medicine cap - that is, give a solid filling to our pimp tops.

Very lush Christmas trees are obtained if you make a lot of additional columns and many layers of such twisted pancakes.

Knitted Christmas tree pendants
Like crochet Christmas decorations.
You can crochet small flat Christmas trees. Decorate them with beads, rhinestones, sequins and sew a loop on top so that such a hand-knitted Christmas tree can be hung on a spruce branch.

A flat herringbone can be DOUBLE-LAYER - have a front detail and a back detail. The parts sewn together give a cavity between themselves, which can be filled with cotton wool or padding polyester - you get a plump crocheted Christmas tree (as in the photo below).

The direction of knitting can be straight - as in the diagram above. Or we can knit oblique symmetry of the rows. To do this, we simply change the direction of the row in the middle of the tree - along its central axis, as in the photo below.

We begin to knit such a Christmas tree - from the bottom up. We crochet a leg - just 6 airs + 2 to climb to a new row. Then the 2nd row - 6 columns, and the 3rd row - 6 columns. It turned out the leg of the Christmas tree in the shape of a rectangle
Then you need to make a SEMICIRCLE on this leg (in the form of a mushroom cap). Just knit half a circle - the center of the circle will be the middle of our just connected leg. This half circle will set the direction for all other rows of the Christmas tree- will make these rows break in the center - on 2 slopes of the Christmas tree.

A simple crochet Christmas tree made of thick aluminum wire. From aluminum wire we twist the shape of the SNAKE in the form of a Christmas tree. And we tie it with a crochet - just single crochets. As if our wire is the first row of knitting, and we just crochet it under the bottom. Nothing complicated.
An excellent exercise for children who are just learning to hold a hook in their hands - it is much more convenient for children to knit on a wire - it is solid, it is convenient to hold it in their hands and children quickly get used to knitting on such a comfortable simulator. Without psychos and hysterics.

Here are some ideas for those who want to crochet a Christmas tree with their own hands. Now you can choose a task that is feasible for your hands, suitable for the number of threads and time costs.
Good luck with your work and a clever hook.
Olga Klishevskaya, especially for the site ""
If you like our site, you can support the enthusiasm of those who work for you.
Happy New Year to the author of this article, Olga Klishevskaya.
Usually Christmas trees from the side look at people sitting at the festive table, having fun, pouring toasts and wishes in honor of the New Year. The green beauty is the main character of the holiday, and her place is in the center of the table.
Do you think it is impossible to place it on the table?.. Maybe! If you put a crocheted Christmas tree on the neck of a bottle of champagne.
Work is within the power of anyone who has the skills of crocheting at least at a minimum level.
To work, you will need green yarn and a hook that matches it in thickness. In this case: yarn - wool 50%, hook number 3. We collect 5 air loops (ch), connect them into a ring. In the first row, we knit single crochets (st.b / n), 2 in each of the dialed ch. The second row is double crochets (st / n), in the course of knitting we evenly add loops so that the circle turns out to be even. (Photo 1)
We continue knitting in a circle. The third row (and all other odd ones) - st.b / n. The fourth row (and all other even ones) - senior / n. We knit rows without adding loops - we get the walls of the cylinder. Where the neck of the champagne bottle begins to expand, turning into "shoulders", we begin to add loops. We have something similar to a skirt. The last row is finishing: st.b / n, 5 ch, st.b / n, 5 ch. and so on until the end of the row.
This is the trunk of a Christmas tree. (Photo 2)

Now let's start creating lush needles. We collect a lot of v.p. To find out how many of them specifically, we do a fitting: we wrap the trunk of the Christmas tree in a spiral with a chain of air loops, from the top to the skirt. I got about 200 vp. When the set is done, we knit them with st.b / n. (Photo 3)

In the next row we knit: st.s / n, 5ch, st.s / n (we stick the hook into the 3rd loop from the previous st.s / n, skipping two loops of the base). Again 5vp, st.s / n and so on until the end of the row. (Photo 4)

We knit the air loops of the previous row with st.b / n. To do this, you can take a green thread, but a different shade. (Photo 5)

The needles are ready, it remains to sew them with neat stitches to the trunk (with a hem-type seam). (Photo 6)

The tree needs to be decorated. As decoration, you can use old beads, beads, other tinsel. (Photo 7)

We put the Christmas tree on a bottle of champagne. We put a star on top. Fluffy New Year's beauty will be the main decoration of the festive table. (Photo 8)

Join our group "Vkontakte" vk.com/site where you will be the first to know about our new master classes, and other needlework masters.
New Year is always a holiday. Children and adults are waiting for this holiday, they are preparing for it in advance: they decorate windows, put up Christmas trees, prepare gifts and think over the festive menu. I want everything to be magically unusual on this night. Therefore, even ordinary things need an unusual decoration, and even more so New Year's champagne.
I suggest you decorate champagne for the new year with your own hands by tying the Christmas tree.
A banal bottle of champagne in such a case turns into a useful and unusual New Year's gift - on the one hand, a symbol, on the other hand, there is something to fill the glasses for the chiming clock ... You can put this on the festive table and take it with you as a guest.
How to tie a Christmas tree for New Year's champagne?
And such a tree fits in quite simply. It is better to use hook No. 3-4. One Christmas tree takes a little more than half a skein of yarn.

Crochet Christmas trees start with a chain of air loops.

We knit a chain of the required length, trying it on a bottle of champagne.

We connect the chain into a ring. We knit Christmas tree - case around single crochet constantly trying it on the bottle.

Scheme There is no crochet as such. The number of loops and rows depends on the thickness of the yarn and the density of knitting. If the cover is tight on the bottle, then add the required number of loops in a row, knitting two columns on one loop of the base.
I specifically knitted a sample of simple threads to make it clearer, since on yarn "grass" I can not see anything.

If the cap is too loose on the bottle, then subtract

Thus, we knit our Christmas tree of the required height, constantly trying on her on a bottle of champagne.

Closer to the neck we start diminish the number of loops in a row, knitting columns through one loop of the base.

Having tied the whole bottle, we reduce the number of loops to a minimum and close the last loop, pulling the thread through it.
Can top our knitted Christmas tree is fancifully bent.
This will require elastic wire approximately 10-12 cm. Gradually reduce the number of loops on the top of the Christmas tree up to 3-4 loops. Insert the wire into the hole. From the wrong side, we bend one end of the wire with a hook and put a small piece of cotton wool or synthetic winterizer under it.

We bend it 90 o so that this hook rests on the cork of the bottle in a half ring. If you remove the cover, it looks like this:

And here it is from the front side.

We continue to knit the cover, tying the wire, knitting loops on both sides in a circle.


If, due to the synthetic winterizer, the top is higher than the cork bloated, it can be pulled off a little by stitching it with a matching thread through and through in several places.
To our bottle cover couldn't fly at the most inopportune moment, and the bottle did not crash on the floor, below it is better to do strings.
In the intervals between the loops we thread with a hook tape.


We tighten the ribbon and tie it with a double bow. Now a bottle of champagne can't fall out from a knitted case.

Let's move on to the most interesting and creative process - decoration knitted Christmas tree.
The Christmas tree can be decorated with large beads and small bows tied on a fork.